CIRCLE
Select the Circle command, move to the work area and perform a mouse click in the first insertion point, then, holding down the mouse button, go to the second insertion point of the bounding rectangle of the circle to enter, execute a click with the left mouse button and press the right button to complete the entry. The drawn circle will appear both in the final report and graphic report.
Modify circle: To modify a circle you must first select it with the Selection command, then move the mouse on the circle. Perform a click with the right button, the Circle properties window appears.
Move circle: To move a circle you must first select it with the Selection command, then move the mouse on a vertex of the rectangle that circumscribes the circle, perform a click on that point, and while holding down the mouse button, move the vertex of the rectangle to the new location. To exit the command, press the Esc key on your keyboard.
Delete circle: To delete the inserted circle selects it with the Selection command and press the Delete key on your keyboard.
LINE
Select the Line command, move to the work area and perform a mouse click in the first insertion point, then, holding down the mouse button, go to the second insertion point of the line, execute a click with the left mouse button and press the right button to complete the entry. The drawn line will appear both in the final report and graphic report.
Modify the line: To modify a line you must first select it with the Selection command, then move the mouse on the line. Perform a click with the right button of the mouse, the Line properties window appears.
Move line: To move a line you must first select it with the Selection command, then move the mouse on the point you want to modify, perform a click on that point, and while holding down the mouse button, move the vertex of the line to the new location. To exit the command, press the Esc key on your keyboard.
Delete line: To delete the inserted line selects it with the Selection command and press the Delete key on your keyboard.
POLYGON
Select the Polygon command, move to the work area and perform a mouse click in the first insertion point, then continue with a click for each vertex of the polygon and press the right button to complete the entry. The drawn polygon will appear both in the final report and graphic report.
Modify polygon: To modify a polygon you must first select it with the Selection command, then move the mouse on the vertex of the polygon you want to modify, right click on the vertex an move it to the new position holding the mouse button pressed. To exit the command, press the Esc key on your keyboard.
At right click on one of the polygon's vertices the Polygon properties window appears.
Delete polygon: To delete the inserted polygon selects it with the Selection command and press the Delete key on your keyboard.
Select the Rectangle command, move to the work area and perform a mouse click in the first insertion point, hold the mouse button pressed and draw the rectangle, release the mouse button and click to finish the insertion. The drawn rectangle will appear both in the final report and graphic report.
RECTANGLE
Modify rectangle: To modify a rectangle you must first select it with the Selection command, then move the mouse on the vertex of the rectangle you want to modify, right click on the vertex an move it to the new position holding the mouse button pressed. To exit the command, press the Esc key on your keyboard.
At right click on one of the rectangle's vertices the Rectangle (Polygon) properties window appears.
Delete rectangle: To delete the inserted rectangle selects it with the Selection command and press the Delete key on your keyboard.
TEXT
Select the Text command, move to the work area and perform a mouse click in the insertion point, hold the mouse button pressed and draw the text box, release the mouse button and click to finish the insertion. Insert the text in the window and choose also text properties from the same window. The text will appear both in the final report and graphic report.
Modify text: To modify a text you must first select it with the Selection command, then do all modifications in the Text properties window.
Delete text: To delete the inserted text selects it with the Selection command and press the Delete key on your keyboard.
RASTER IMAGES
The software allows the insertion of raster images and also offers scaling functions for them. The image displayed on the worksheet can be brought to the actual size using the Calibrate command, that is to say the distance measured between two points corresponds to the actual distance.
Insert: the command allows the insertion of an image, and after the image to insert is chosen, the calibration window will appear, as in the figure below:
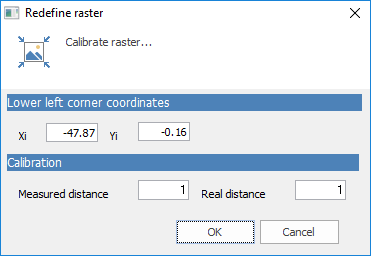
Image calibration window
This window remains in foreground to allow the user to measure, using the calibration instrument, the distance between two points in the image (to be entered in Measured distance). In Real distance must be entering the real distance between the two points.
To calibrate the image after inserting it, proceed as follows: select the image with the Selection tool, press Calibrate button in the toolbar, right-click on the image to calibrate and press Calibrate image.
Delete rasper images: select the image with the Selection tool and press Delete key on the keyboard. Select the Delete command in the toolbar to delete all raster images.
© GeoStru