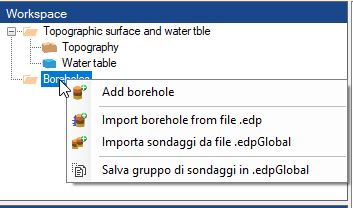
Creating surveys
To create a survey it is possible to choose “Add survey” by clicking on the topographic surface, or on the “Surveys” button.
In the “Details” menu you will have to insert the survey code, that is the name that will be viewed, a description, the coordinates of the survey and in the “Stratigraphy” table the different layers of the soil, by inserting the depth of the layers, and by choosing the type of soil for every layer.
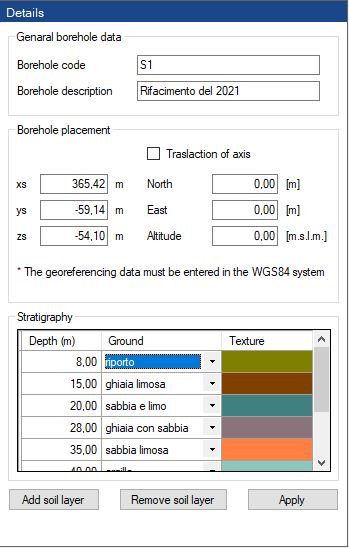
By clicking on “Apply” the 3d model of the survey will be created.
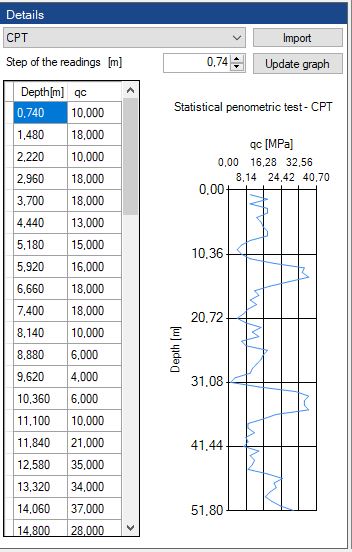
For every survey the results of on site testing can be attributed to it, to do so you have to click on the survey, choose “Add trial results”, and after “Import”, at this point the graph of the trial will be viewed in the “Details” menu, and near the survey.
Import of surveys form .edp and .edpglobal files
(Surveys can be imported from: TXT text file, AGS4 (Standard BIM), EDP known GEOSTRU data interchange format)
To import one or more surveys it is sufficient to click on the “Surveys” button and choose “Import survey from file EDP”, therefore select the surveys to import, and click on “Open”, or it is also possible to drag one or more EDP files on the “Surveys” button.
The same operations can be carried out for EDPGlobal, that is the files that contain information in groups of surveys.
Export of surveys in .edp and .edpGlobal files
To export a survey in a EDp file it is sufficient to click with the right button of your mouse on the selected survey and choose “Save survey as .EDP file”, meanwhile to save an entire group of sueys, it is possible to click on the “Surveys” button and choose “Save survey group in .EDPGlobal”
© GeoStru