To insert retaining walls on the slope proceeds as follows:
1. Define the types in Walls in the Intervention works definition panel, on the right side of the screen.
2. After defining one or more walls, in the same panel you will see active the icon related to the insertion of the wall (a wall with the + sign on the left side).
3. Go with the mouse in the work area and left click on the insertion point.
4. To insert the coordinates you can use the panel on the right side of the screen. Choose Modify (second wall icon) and insert the new coordinates in the table (or simply move the wall in the work area).
5. Click Apply button to confirm.
To delete a wall, choose the last of the three wall icons (wall with x sign on the left side) and click on the wall to delete.
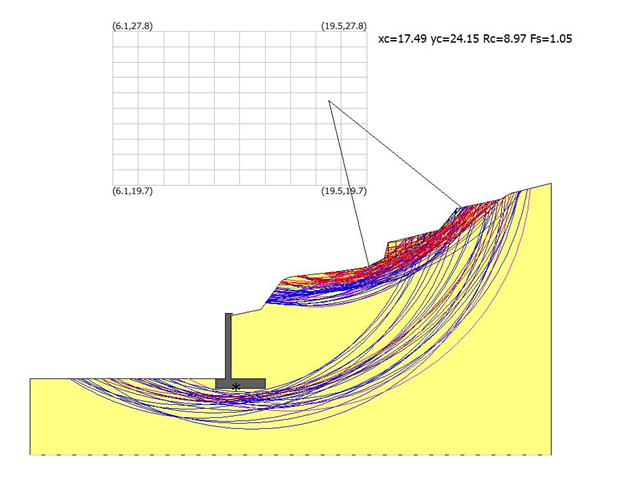
It is possible to exclude the sliding surfaces that intercept the wall. In order to apply this condition, it is necessary to access the intervention panel and the window in which the wall geometry is characterised, choose the non-deformable type and do not select the automatic profile modification option. The result obtained is shown in the figure below.
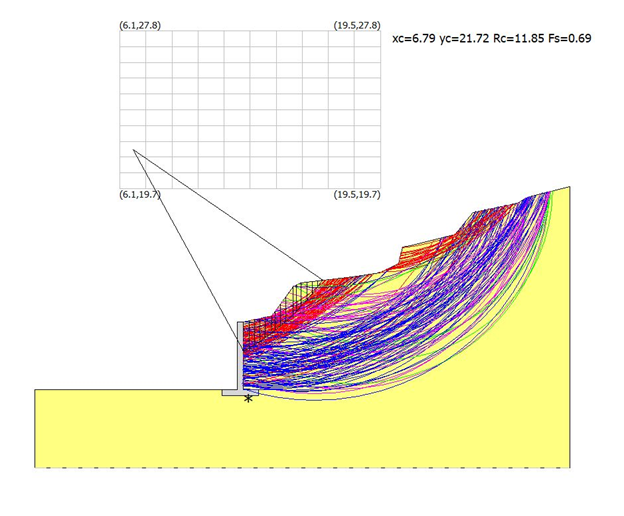
If the automatic profile modification option is selected, the programme also considers sliding surfaces that interfere with the wall.
To insert anchors proceeds as follows:
1. Define the types in Anchors in the Intervention works definition panel, on the right side of the screen.
2. After defining one or more anchors, in the same panel you will see active the icon related to the insertion of the anchor (an anchor with the + sign on the left side).
3. Go with the mouse in the work area and left click in the insertion point.
4. To insert the coordinates, you can use the panel on the right side of the screen. Choose Modify (second anchor icon) and insert the new coordinates in the table (or simply move the anchor to the work area).
5. Click Apply button to confirm.
To change their position choose the Edit command (central icon) from the Intervention Works panel and position yourself on the wall to be moved, assign the new position in the Work Status frame displayed at the bottom of the panel.
To delete an anchor, choose the last of the three anchor icons (anchor with x sign on the left side) and click on the anchor to delete.
Pilings
To insert piles proceeds as follows:
1. Define the types in Pilings in the Intervention works definition panel, on the right side of the screen.
2. After defining one or more piles, in the same panel you will see active the icon related to the insertion of the piles (a pile with the + sign on the left side).
3. Go with the mouse in the work area and left click on the insertion point.
4. To insert the coordinates you can use the panel on the right side of the screen. Choose Modify (second pile icon) and insert the new coordinates in the table (or simply move the pile to the work area).
5. Click Apply button to confirm.
To change their position choose the Edit command (central icon) from the Intervention Works panel and position yourself on the wall to be moved, assign the new position in the Work Status frame displayed at the bottom of the panel.
To delete a pile, choose the last of the three pile icons (pile with x sign on the left side) and click on the pile to delete.
© GeoStru